What stayed in the car, what needed fixing and what we still use. Our photos and stories sit beside current specifications to help you plan your own setup.
Our experience and manufacturer information are identified separately below. Source dates appear with the product notes. Current specifications may differ from the older equipment in our photos.
Shopping for someone else? See our holiday gift guide, gear from these notes with years of use behind it.
Loading the car? See our family car-camping packing list, with saved checklists for your tent, kitchen, bedding and kids gear.
The setup at a glance
What needs to fit before you buy?
Start with the space in your car. These five comparisons cover the cooking, shelter, washing and storage choices we faced. Some show current versions of our gear; others are references for models we have not identified. Each note makes the difference clear.
Cooking
Getting dinner started after a late arrival
Our first Julian trip used a small wood-burning stove. It took a while to cook, even though the drawer kitchen worked well. A Cook Partner stove appears in a later photo.
Our YETI Tundra Haul occupied a large part of the space above the drawers. We used it for everything and pulled it partway out on a strap for easy access.
An earlier, taller recovery box had to come off the roof rack in front of our apartment garage after every trip. Our Pelican Storm iM3220 was shorter but longer, still fit the roof rack, and cleared the garage, so it could stay on. The full mounted height is not recorded.
The notes below also cover our chairs, awning, tire kit and electrical setup.
Shelter
The tent and the things we left inside
The missing items, right where we left them. From our March 2020 post.
On a windy Thanksgiving pack-up, we hurried to get everything away. Our Leatherman and sandals went missing. The next time we opened the Gazelle, there they were, still inside the tent.
We love how quickly the Gazelle goes up. Packing the car still took effort, and that rushed pack-up taught us to check inside the tent before folding it.
A current tent to compare: Gazelle T4
Model
GT400GR, current T4 Hub Tent
Floor / height
94 × 94 in / 78 in
Packed length / weight
66.5 in / 30 lb
Included
Rainfly, stakes, guy lines and duffle
These are Gazelle’s current T4 specifications, not measurements of our tent. Useful for car campers who value a pre-assembled hub frame; check that the long packed bag fits your vehicle and that your pads fit the floor. We have not tested this current version.
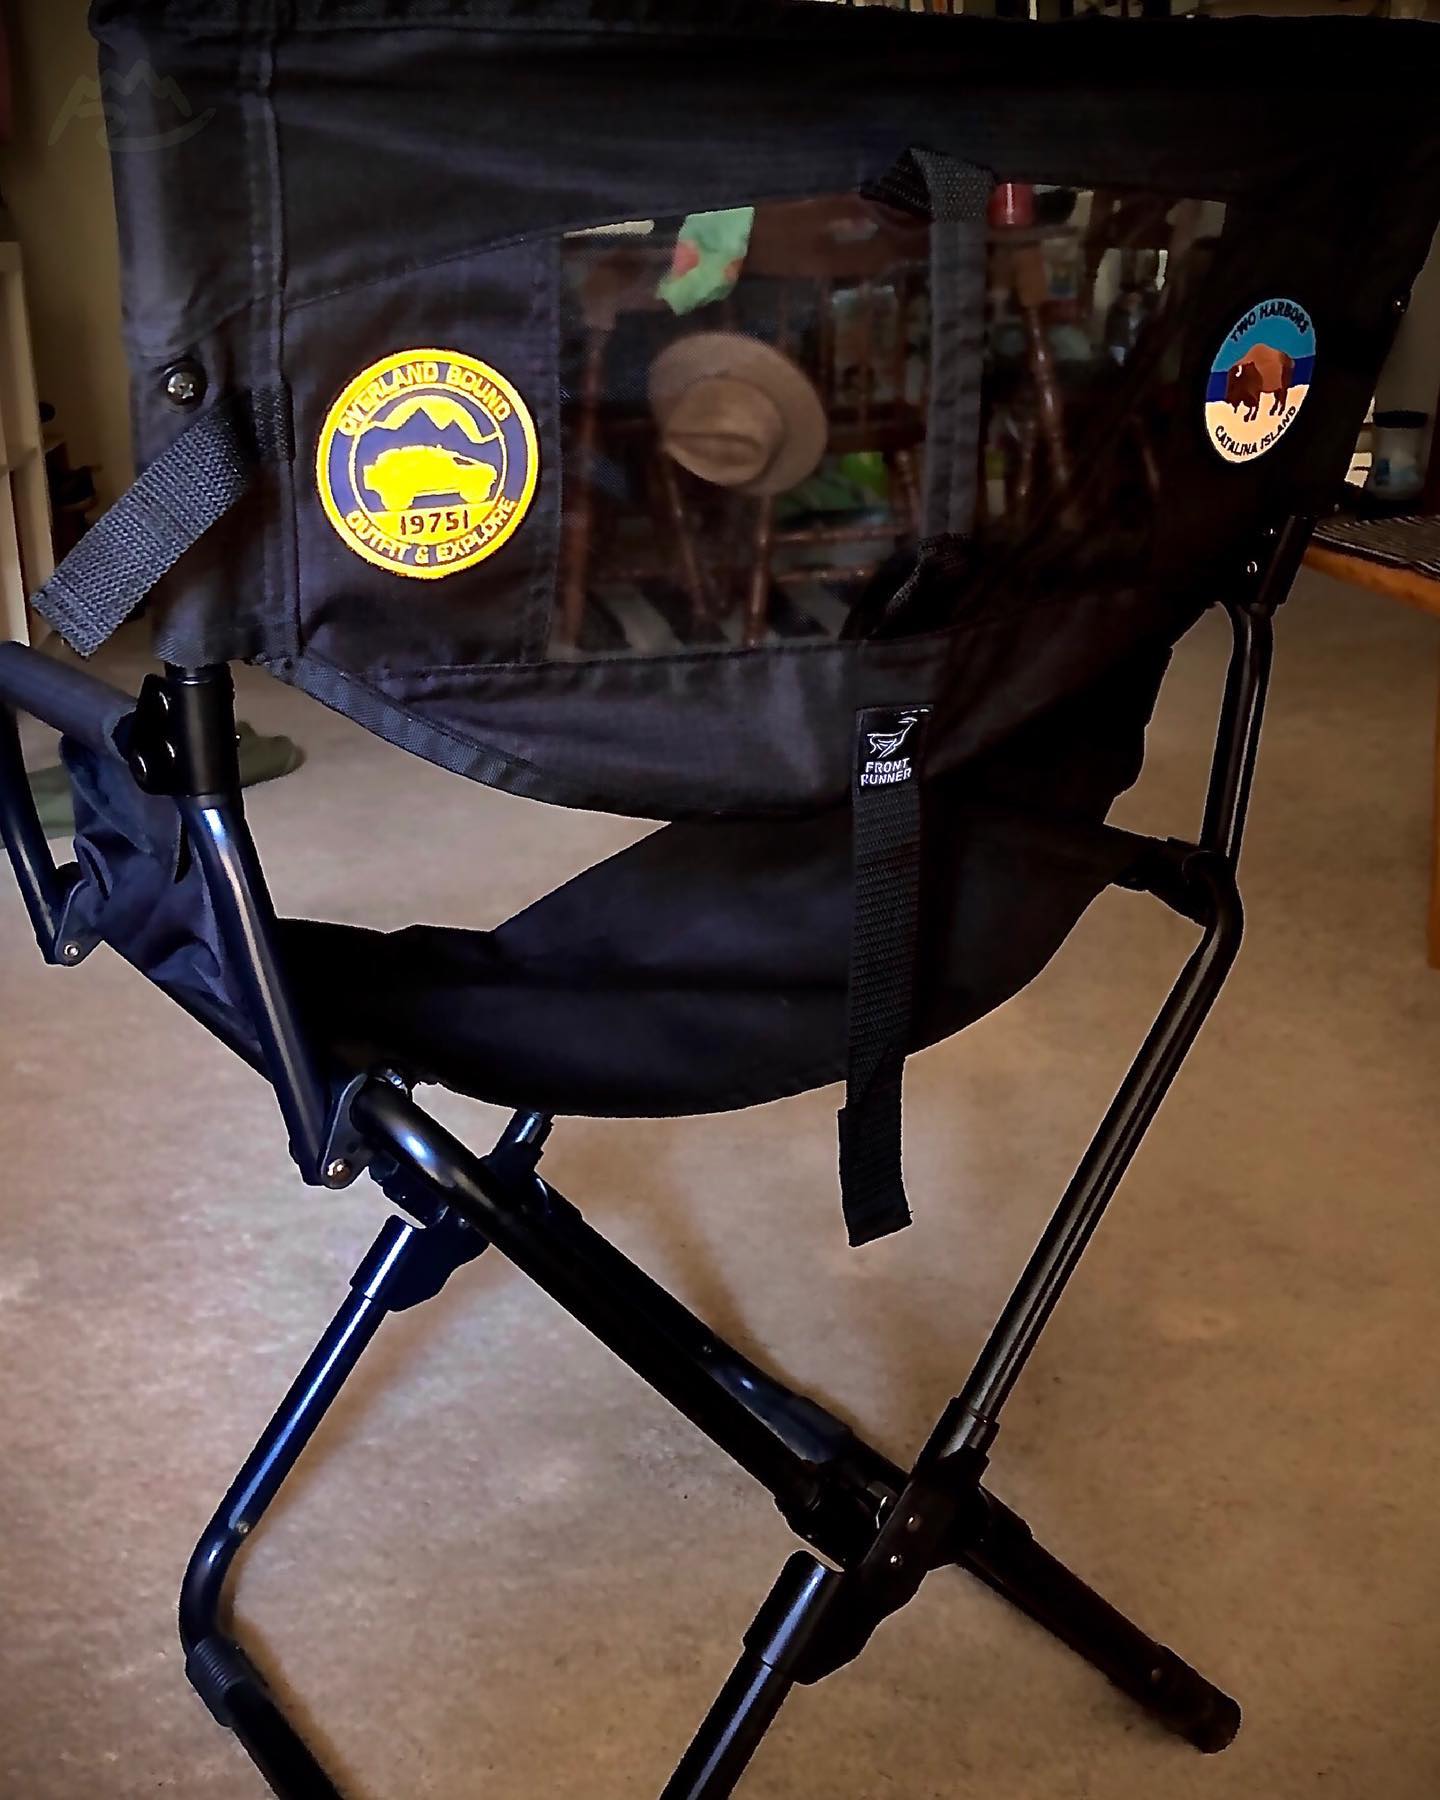
Our chair, patched with Overland Bound and Two Harbors patches so we could tell it apart from our friends' identical ones. From our July 2020 post.
Quick take
Our Front Runner Expanders folded small and were comfortable for us. In our September 25, 2026 account, both were still in use and the repair to probably one chair was holding.
What we loved
Folded up really small, which mattered because we didn’t have a lot of space.
Very comfortable, with a cup holder.
Friends liked them enough to buy the same chair too.
What bugged us
Probably one chair needed a rivet repair a few years in. In the September 25, 2026 account, the repair was still holding.
Who it’s for: Worth comparing if cargo space is tight. Our pair packed small; probably one chair needed a rivet repair in our dated account. That history does not predict another chair’s condition.
Long-term: Bought over the holidays at the Front Runner store in Ventura. Probably one chair got a rivet repair a few years in. As of the September 25, 2026 account, the repair was holding and both chairs were still in use in the cab-over camper.
Our two chairs are Front Runner Expanders. These are Dometic's current published CHAI007 specifications, checked September 25, 2026; our older units may be an earlier production version, so their exact measurements could differ. The manufacturer describes a three-step fold. Confirm seat height, load rating and replacement parts before buying more.
Product photo: Sitpack. This is the manufacturer's image of the Campster II, not a photo of a chair we own.
In a recorded September 27, 2026 decision, we were considering Sitpack's Campster II for two more chairs. We had not used the Sitpack. No later choice or purchase is confirmed here.
Seat height
30 cm (12 in)
Weight
1.46 kg (3.23 lb)
Packed size
About the size of a 1.5-litre bottle, per Sitpack
Frame / seat
Aluminium frame, 600D ripstop nylon seat
Load rating
Not on the product page, and reviews list different figures; confirm with Sitpack before buying
These are Sitpack's published Campster II figures, checked September 27, 2026, not our measurements.
What others are saying
We haven't sat in one yet, so here is what published reviewers found. These are the three hands-on Campster II reviews we could find, all from 2024:
Advnture (Pat Kinsella, August 2024) liked that "it takes up very little space, is quick and easy to put together and fold back up," but found it "a little on the low side for sitting and eating at some camping tables."
T3 (Derek Adams, May 2024) compared it with Helinox and Nemo chairs: "the Sitpack Campster II just swings it for outright comfort," though "its extra weight could be a hindrance" for backpackers. His top pick overall was the Helinox Chair Two.
The Gadgeteer (Theresa Villeneuve, May 2024, free sample from Sitpack): "It's well made and easy to carry," but the removable rubber feet "don't stay on."
The reviewers liked its compact fold and comfort. The low seat may be awkward at a camp table; T3 also flagged weight for backpacking, and The Gadgeteer reported loose removable feet. Advnture and T3 are sister sites. We have not checked those findings ourselves.
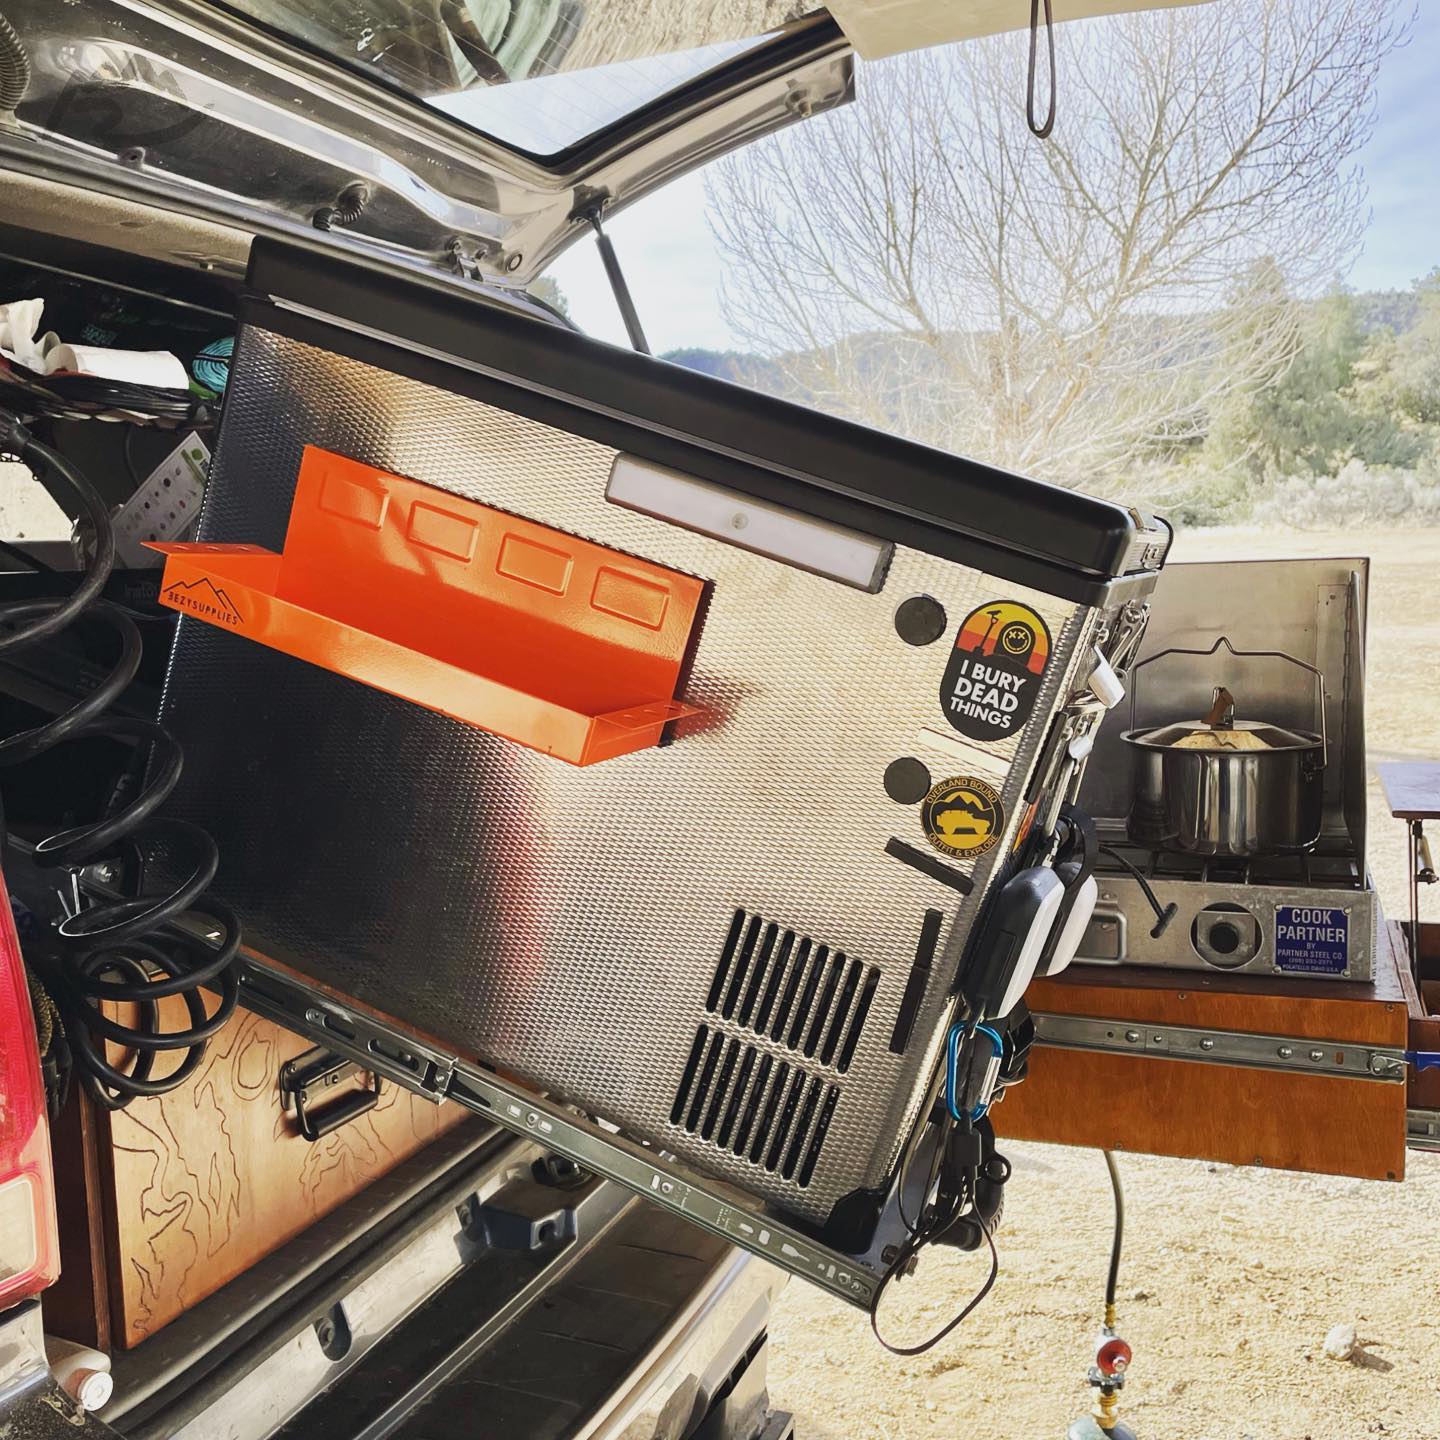
Our later kitchen equipment, from the February 2021 post.
Quick take
“The SnoMaster was a great fridge. The slide was really awesome. It worked really well together… it held everything in place, nothing moved.”
What we loved
Fridge and slide worked so well together it “was almost designed for it.”
“Very efficient”: held our food cold and didn’t drain the battery much, even in 100°F heat on multi-day trips.
A remote let us start the fridge, set its temperature and check on it from up front, without walking back.
The metal exterior held magnetic lights and the EEZY tray in place.
What bugged us
A heavy fridge, but the slide system meant “it didn’t really matter.”
Power “was initially an issue” before we added a second battery; after that, it wasn’t an issue at all.
Who it’s for: May suit campers doing multi-day trips in hot weather who are ready to add a second battery, and eventually solar, to run a powered fridge.
Long-term: Bought together with the slide at regular price from GTF Overland in Long Beach. Used until we sold the 4Runner and gave up the whole system; no longer owned. No repairs are recorded.
Our first kitchen outing near Julian used a Yeti cooler and a little wood-burning stove. We arrived late, and cooking took a while. The drawers worked well enough that the kitchen stayed part of the car, with a few changes to the latches afterward.
By our February 2021 photograph, the equipment around those drawers had changed: a SnoMaster fridge on a DFG Offroad slide, an orange EEZY Supplies tray and a Cook Partner stove. We bought the SnoMaster and the slide together, at regular price, from GTF Overland in Long Beach. The fridge was heavy, but with the slide system it didn’t really matter: the slide held everything in place, and nothing moved. The kitchen was still the part we loved. The later photo shows how we changed the equipment around the drawers.
The SnoMaster was very efficient in our experience. It worked well, held our food cold and didn’t drain the battery, even in 100°F heat on multi-day trips; we never measured how much power it actually used. Power was an issue at first, before we had a second battery, but after we added one it wasn’t really an issue at all, and we also used the Overland Solar panel to help keep that battery charged on hot days. A remote let us sit up front, start the fridge, set its temperature and check that it was working, without walking back to it. Its metal exterior also held magnetic lights and the EEZY tray in place. We used it until we sold the 4Runner and gave up the whole system; we no longer own it. We have not identified its exact model, so we are not naming one here.
An earlier cookware post shows our MASTERPAN folding-handle grill pan beside another skillet, utensils and a scrubber, then a meal cooking in the pan. It is a useful reminder to measure pan width and handle storage along with stove space. We have not confirmed the pan's size or recorded a long-term verdict. Compare the kitchen gear with current sizes kept separate from our older photo.
Current kitchen specifications
Cook Partner 22-inch
Two burners; 12 × 22 × 3.5 in; 17 lb
Pan spacing
12 in between burners; windscreen included
EEZY tray construction
Aluminum with rubber-coated magnets
EEZY tray weight
Current listing: 1.85 lb
DFG Offroad slide construction
Current product info: 1/8 in aluminum frame and tray with stainless hardware, made to fit a specific fridge model
These current products are comparison options, not confirmed versions of ours. The stove’s footprint and pan spacing help plan a drawer; its weight matters when lifting it out. EEZY’s combined listing states a 10 lb tray load, while its separate tray listing states 5.5 lb. Confirm the limit for the exact version before ordering. Fridge capacity, exterior dimensions and power draw still need the SnoMaster model label. The slide maker is DFG Offroad.
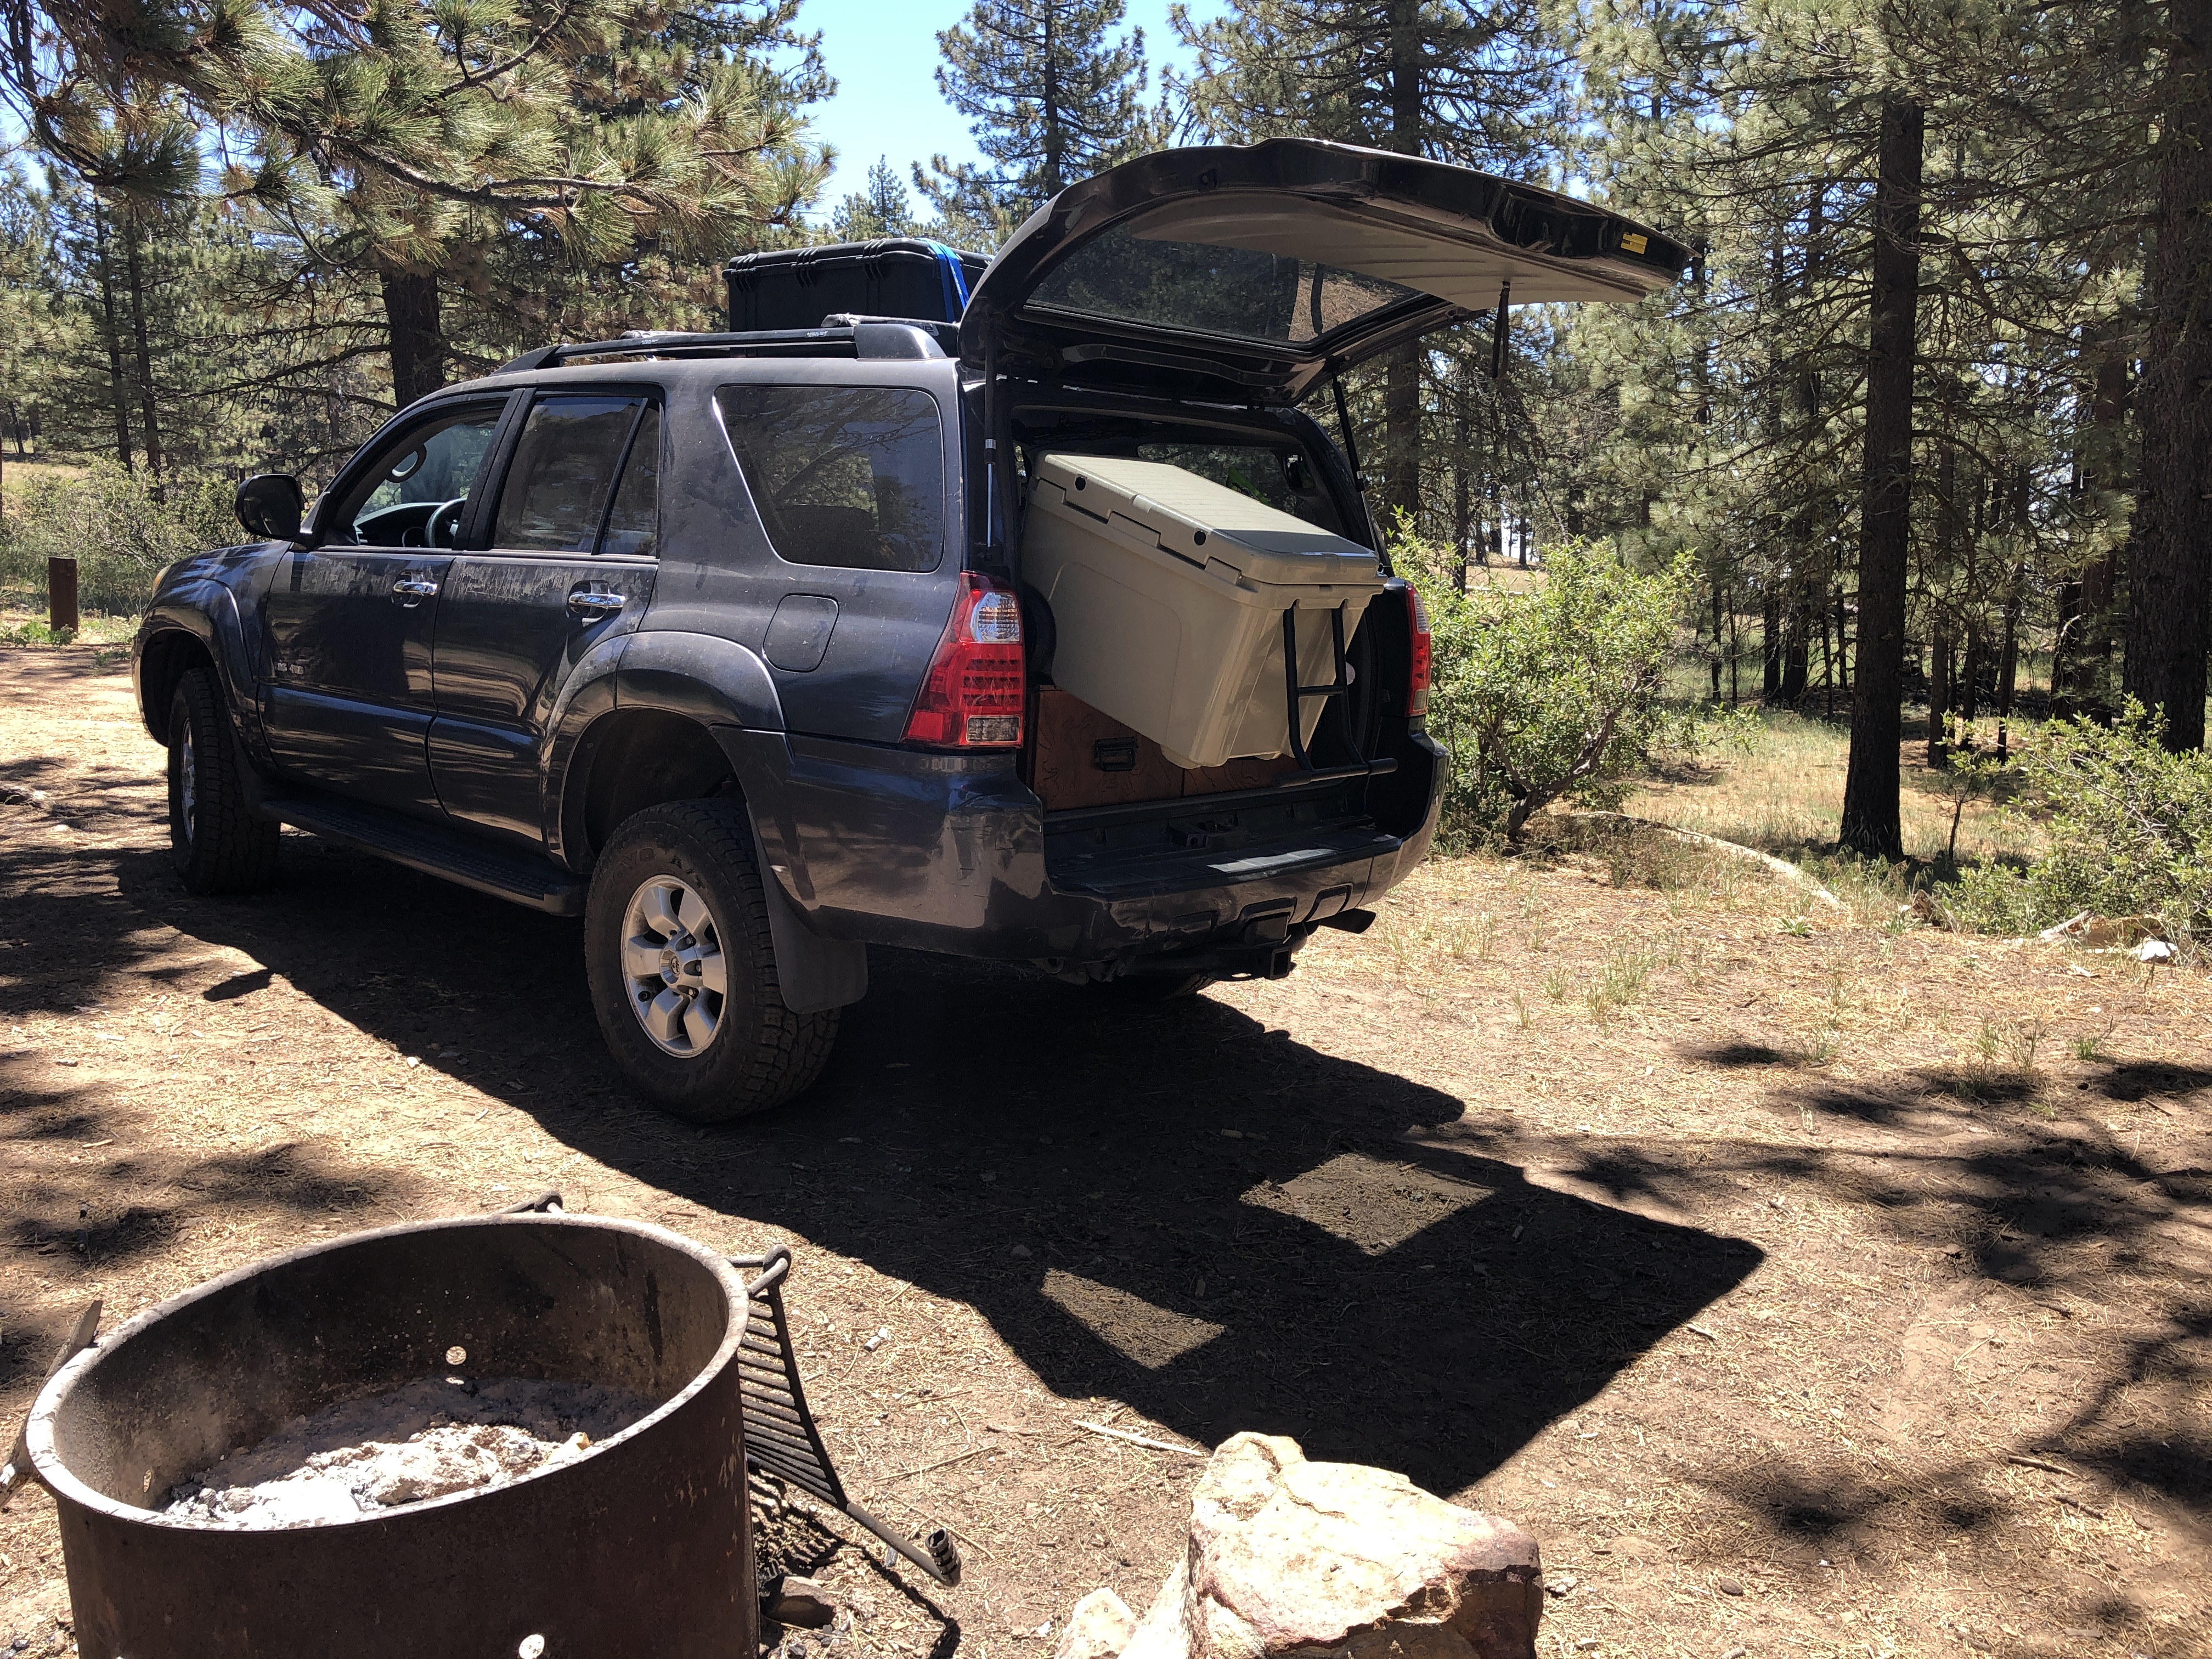
Our YETI Tundra Haul, pulled partway out on a strap so it sat at an angle for easy access.
Quick take
“That cooler worked really well when we first started out. We used it for everything,” before the SnoMaster fridge took over cold storage.
What we loved
Wheels and a front handle made it easy to move: “it works really well.”
Used it for everything in our early camping seasons.
In our experience it “held ice for a long time,” though we never timed it.
A strap let us pull it partway out of the hatch at an angle for easy access.
Who it’s for: May suit trips where avoiding electrical draw matters and there’s hatch space above a drawer kitchen to dedicate to a hard cooler.
Long-term: Used through our early camping years before we upgraded to the SnoMaster fridge. Current ownership status and its production year are not recorded, and no repairs are mentioned.
Before the SnoMaster fridge became part of the kitchen, we camped with our YETI Tundra Haul, the wheeled cooler with a handle on the front. In this photograph it fills much of the open hatch above the drawer system, with the rest of the trip packed around it. We ran a strap from the cooler to the car so we could pull it out halfway, where it sat at an angle for easy access, as shown here.
We used it for everything, and in our experience it held ice for a long time; we never timed it. A hard cooler like this can keep food and ice together without electrical power, but its outside dimensions, empty weight and lid clearance still matter inside a 4Runner.
YETI Tundra Haul: the model we used
Exterior
28.1 × 18.6 × 19.6 in
Interior
19.1 × 11.4 × 14.1 in
Empty weight
37.5 lb
Published capacity tests
82 cans only or 64 lb of ice only
This was our cooler: the wheeled YETI Tundra Haul. These are YETI’s current published specifications, checked September 25, 2026; our older unit may be an earlier production version, so its exact measurements could differ. YETI measures the two capacity figures separately; neither describes a mixed load of food and ice. Before choosing a size, measure the cargo opening, the space above any drawers and the clearance needed to open the lid.
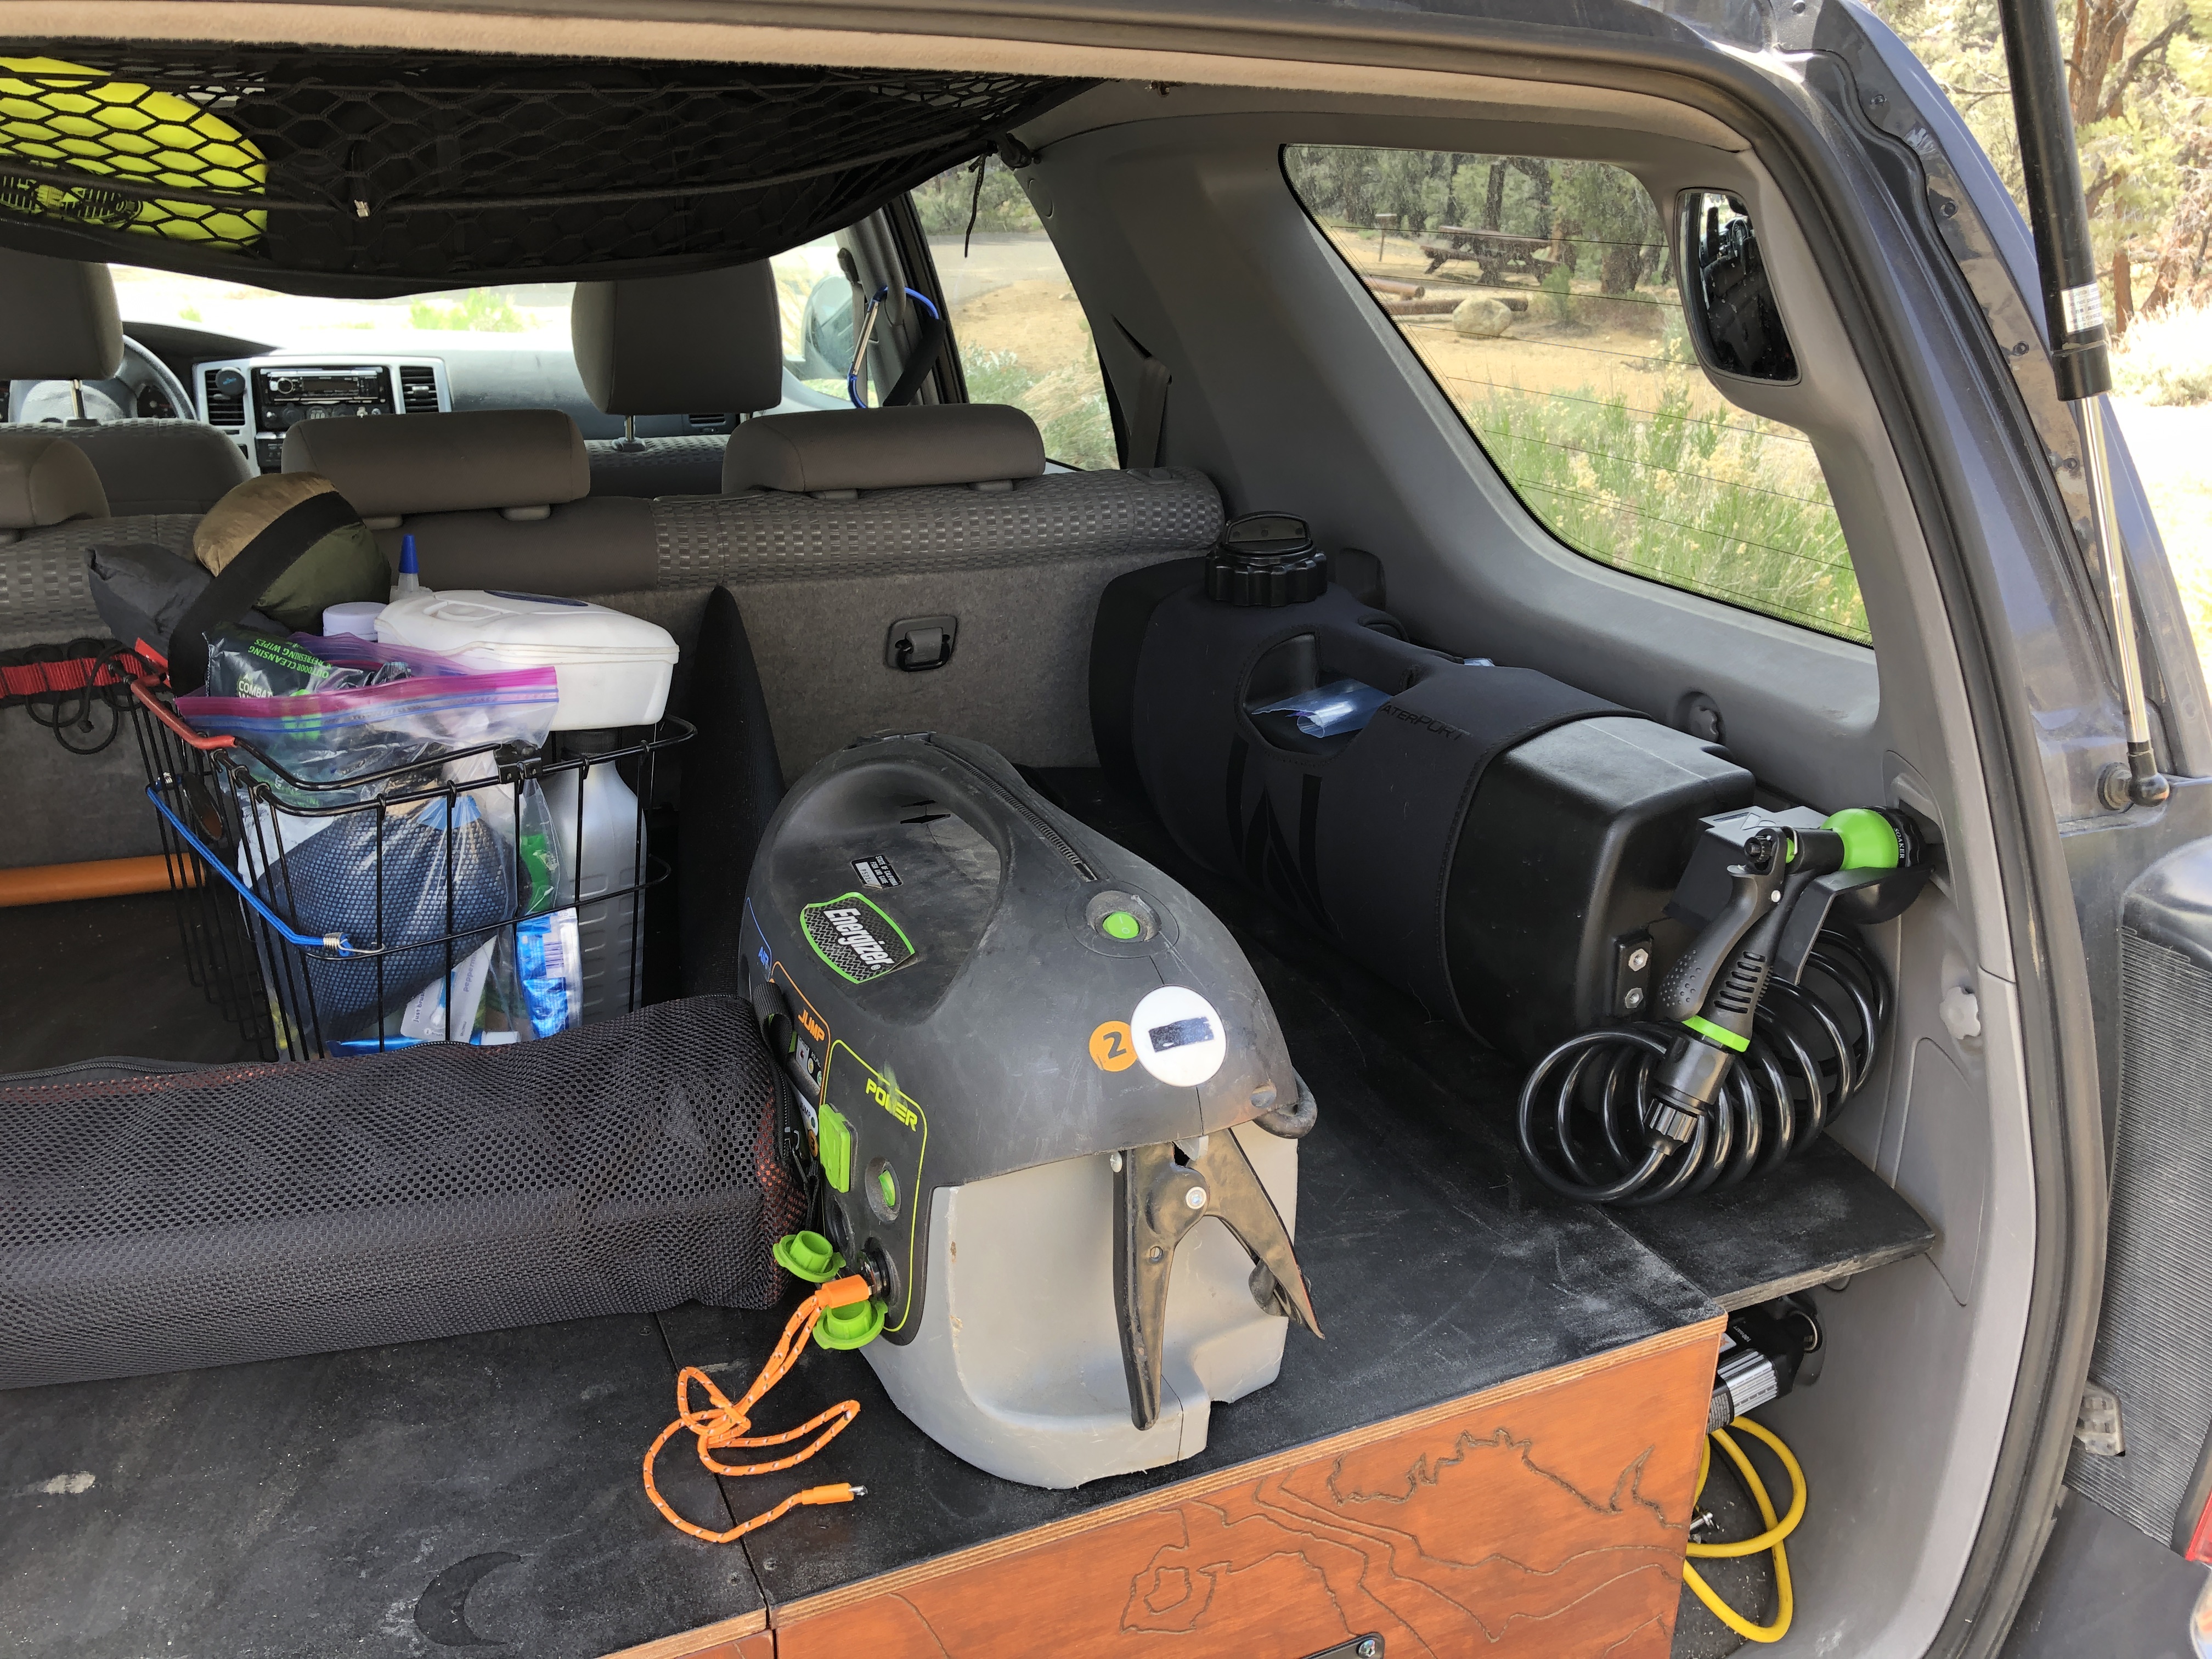
Our WaterPORT washing setup beside the rear drawers in the 4Runner.
The WaterPORT lived along the passenger side of the cargo area, with its coiled hose and spray nozzle ready at the hatch. It gave the washing setup a fixed place instead of adding another loose container to unpack at camp.
The tank, hose and mount took up space beside the drawers, even between trips. We have not recorded the tank’s model label, mounting hardware or long-term pressure performance, so the photograph does not establish an exact current product match.
A current model to compare: WaterPORT DayTank
Capacity
4 gal / 15.1 L
Dimensions
25.5 × 7.5 × 11 in
Hose / nozzle
8 ft coiled hose / five-pattern spray nozzle
Pressurization
Garden hose, bike pump, air compressor or optional pump cap
The photographed tank appears consistent with the DayTank form, but its generation is unconfirmed. WaterPORT lists the current tank at 18 lb empty and up to 40 psi. Its product page gives conflicting filled weights of 42 and 44 lb, so plan the mount and cargo load around the weight of the tank plus the actual water you carry. Mounts are sold separately.
From our own camping photo archive. The exact trip date and WaterPORT model generation are not recorded.
Vehicle storage
Frost on the Victory 4x4 rack
A cold morning on the Victory 4x4 rack above our 4Runner.
The frosted side rail is a close view of the rack that carried gear above the 4Runner. Moving bulky equipment to the roof opened room inside the vehicle, but it also made rack layout and the height of every loaded item part of packing the car.
Our photograph confirms the Victory 4x4 brand, but not the rack’s production revision, installed weight or the load we carried that morning. Roof weight changes vehicle handling and total height, so a rack rating is only one part of planning a safe setup.
Current comparison: 4th Gen 4Runner Evolution rack
Fitment
2003–2009 Toyota 4Runner
Listed weight
49 lb
Listed dimensions
81 × 47.5 × 2.5 in
Installation
Full bolt-on; no drilling listed
These specifications describe Victory 4x4’s current Evolution Series rack, not necessarily the revision in our photo. The current product page describes aluminum side rails, aluminum crossbars and steel mounting brackets. It presently gives conflicting static-load figures of 800 and 1,000 lb in different parts of the page, so verify the current rating and follow the 4Runner’s own roof-load and gross-weight limits before carrying equipment.
From our own camping photo archive. The exact trip date and rack production revision are not recorded.
Camp shelter
From the expo to camp
The awning at camp, from our April 2020 post.
We first saw the Overland Vehicle Systems awning at an expo, then tried it on a campout. At camp it became part of the space around the 4Runner, with the kitchen and chairs beneath and beside it.
Before choosing an awning, check where you will cook and sit with it open, and whether there is room to walk around the hatch. We have not confirmed our awning’s size or wind rating.
Choosing the right version
The exact OVS model still needs confirmation before we recommend a matching product. Compare mounting position, opened coverage and required supports against the way you use the rear kitchen. The historical catalog example below shows why checking the part number matters.
Size reference from the OVS archive
Catalog example
Nomadic 270 driver side, part 19519907
Closed / open
88 × 7 × 6 in / 240 × 157 in
Catalog weight
71.87 lb gross, not installed weight
The manufacturer’s historical catalog provides a size reference, not identification of our awning or a current stock listing. A wraparound awning can cover the side and rear working area, but needs more deployment space than a straight awning. Confirm your model, mounting brackets, rack capacity and hatch clearance before choosing.
The packed recovery box, from our April 2021 post.
Quick take
The Pelican Storm iM3220 cleared the garage where our old box could not. We no longer have the case, but still use the GoTreads and MORRFlate kit. The Bubba Rope now lives with my brother.
What we loved
GoTreads: “we use them all the time, even now,” for muddy situations and now for leveling the truck camper too.
MORRFlate: “still goes with us everywhere,” used almost every trip, and let us pump up all four tires much faster than before.
Bubba Rope, a gift from my brother: “the best thing ever,” used to pull ourselves and other campers out.
The Pelican case was shorter but longer than the old box, so it cleared the garage without coming off every time.
What bugged us
The earlier, taller recovery box was heavy and had to come off the roof rack in front of the garage after every trip before we could park.
Who it’s for: May suit campers with a tight garage clearance who want a self-contained recovery kit that stays mounted between trips.
Long-term: “We have most of that gear with us, except the recovery box itself.” GoTreads and the MORRFlate kit are still owned and used; the Bubba Rope now lives with my brother, who still uses it. No repairs are recorded for any of these.
The problem started before we reached a campsite. We lived in an apartment building, and an earlier, taller recovery box had to come off the roof rack in front of the garage after every trip before we could drive in. It was heavy work. The Pelican case we replaced it with was shorter but longer. It still fit our roof rack, and it was short enough to clear the garage, so we could leave it in place instead of moving it every time.
The equipment in that box included GoTreads boards, the MORRFlate kit and a Bubba Rope, a gift from my brother, along with a bottle of extra oil, a jack and a compact Stanley toolkit. We used the rope to pull ourselves and other campers out a few times. The case mounted on our Victory 4x4 roof rack using its own anchor points in the crossbar channel. We still have and use most of that gear today, except the recovery box itself.
What to compare before buying
Start with total installed height, including the rack and mounts, rather than the case’s storage capacity alone. Then compare the case’s usable internal dimensions with the gear that must fit inside. We used a Pelican Storm iM3220, no foam; the complete installed height with rack and mounts is still not recorded, so this story is not a fit guarantee for another vehicle or garage.
Pelican Storm iM3220: the model we used
Usable interior
44.00 × 14.00 × 8.50 in
Outside dimensions
47.20 × 16.50 × 9.20 in
Weight
20.4 lb without foam; 24.8 lb with foam
This was our case: a Pelican Storm iM3220, no foam, and ours had wheels. Pelican's own specification pages list only the handles, so check which version you are buying if wheels matter. These are Pelican’s current published specifications, checked September 25, 2026; our older unit may be an earlier production version, so its exact measurements could differ. A long case is worth comparing for organized storage, but the case, contents and mounting hardware all add weight. Check rack and mount compatibility separately, and measure the complete installed height against your garage.
The quad hoses in use, from our July 2021 Cathedral Valley post.
On the Cathedral Valley chapter of our road trip, we finally put the MORRFlate quad tubes to use and shared them. The photograph shows the hoses connected to the 4Runner’s tires.
The kit made inflating all four tires much faster for us, and we still take it on almost every trip. We did not record pressures or time it, so we cannot give a minutes-saved figure.
Current comparison: MORRFlate Braided Quad
Tires
Inflates, deflates and equalizes 1 to 4
Reach
Up to 125 in wheelbase at specified source positions
Gauge
1–150 psi range; 0.1 psi display increments
Air source
Separate compressor or compatible air supply required
Useful if you want to manage several tires from one manifold. The current kit differs from our historical hoses. MORRFlate specifies a source at the center of the front or rear bumper, or the center of the vehicle’s side. Other positions may need extensions; some compressor fittings need adapters. Display increments are not an accuracy guarantee.
Our April 2020 solar photograph caught a second attempt that seemed to be working properly. We added this panel to help keep the SnoMaster fridge’s second battery charged on hot days. The panel’s label identifies it as the Overland Solar Bugout 120, and the post also credited Victron Energy.
The portable panel laid out on the 4Runner at camp, from our own photo archive.
We did not record what changed between attempts or measure the panel’s output.
Solar: the details to match
Confirmed in our photo
Overland Solar Bugout 120
Panel data to obtain
Rated watts, open-circuit voltage and short-circuit current
System fit
Controller input limits, battery voltage and chemistry
Connections
Connector type, polarity and cable requirements
We have not located verified manufacturer specifications for this historical panel. The number in its model name is not a measured output claim. A replacement should be selected as part of the battery system, not by wattage alone. Victron provides a controller comparison and MPPT sizing calculator; neither confirms which controller we used.
The secondary battery and hold-down, from our February 2021 post.
Quick take
We built this second-battery system to run the SnoMaster fridge in the 4Runner, and installed it ourselves. In our words, “the setup was good.”
What we loved
Once the second battery was in, powering the fridge “wasn’t really an issue at all.”
The Off-Grid Engineering kit was designed for the Gen 4 4Runner, and a REDARC BCDC charger kept the second battery charged.
What bugged us
The install was “a little more complicated because of the battery placement.”
Who it’s for: May suit Gen 4 4Runner owners who want to run a powered fridge on multi-day trips and don’t mind a more involved install.
Long-term: We pulled the system out of the 4Runner when we sold it, and we still have it. The plan is to move it to our Ram; we haven’t done that yet.
The kitchen was only one part of getting the 4Runner ready: upgrading to the SnoMaster fridge meant we also had to upgrade to a second battery to run it. In February 2021 we documented that secondary-battery installation with an ODYSSEY battery and an Off-Grid Engineering hold-down, and credited REDARC. The kit was Off-Grid Engineering’s one designed for the Gen 4 4Runner, and the charger was a REDARC BCDC.
A later update showed the distribution and monitoring side of the system. The photograph shows a Victron SmartShunt 500A/50mV beside clear-covered Blue Sea Systems fuse blocks. We added monitoring and distribution as part of the battery system.
Another cargo-layout photo shows a white Hardkorr battery box strapped beside the drawers. We have not identified the box version or the battery inside, and the photo does not establish how it connected to the later Off-Grid Engineering installation. Compare the power setup with the current Hardkorr box as a size reference, not an identification of our older unit.
The battery monitor and fused distribution mounted beside the rear drawer system.
What the photos do not establish
The battery label reads ODYSSEY Performance 34R-790, and the monitor label reads Victron SmartShunt 500A/50mV. The exact REDARC BCDC model, Blue Sea Systems fuse-block part numbers, cable sizes and protection details remain unconfirmed. These photographs record our project; they are not a wiring diagram or an installation guide.
Photo label: ODYSSEY Performance 34R-790
Current catalog name
ODP-AGM34R (34R-790)
Voltage / nominal capacity
12 V / 65 Ah at the 20-hour rate
Size with terminals
10.8 × 6.8 × 7.9 in
Weight / terminals
46.6 lb / SAE posts, reverse layout
The model number is readable in our photo. These figures come from today’s manufacturer page; older documentation lists different capacity figures, so they are not a measurement of our 2021 battery. Match the battery tray, terminal orientation and charger settings. Nominal capacity alone cannot predict fridge runtime.
Second-battery voltage, midpoint or optional temperature sensor
Fuse distribution
Blue Sea Systems; exact blocks unconfirmed
Victron’s current SmartShunt range uses the VictronConnect app for battery state, history and time-to-go information. The 500A/50mV label identifies the monitor’s shunt rating, not the safe capacity of the entire vehicle system. Cable protection, fuse selection and installation must be designed for the complete circuit.
Our lantern at the hatch, from the July 2020 archive. Its exact version remains unconfirmed.
A friend gave us the XL LANDER lantern. Our July 2020 post mentions adjustable red night mode and a magnet added to one light. The lighting entry in the power guide shows both original photos alongside current Cairn XL details and charging checks. Our older versions are still unconfirmed.
The source is our July 2020 lighting post. The XL lantern was a gift from a friend; we have no recorded manufacturer sponsorship.
Current LANDER Cairn XL comparison
Light output
350 lumens listed
Power bank
10,000 mAh listed capacity
Charging
USB-C, 18W PD; USB-A, 2.4A
Protection
IP65; not an immersion rating
Manufacturer listing checked September 30, 2026. These current-model details do not identify the older lights in our photo or predict their runtime.
We brought the Sony α6000 and this lens kit on our July 2020 NEOWISE outing. The body label is readable, but we have not identified every lens or matched them to the sky photos.
Select a photo to view the full frame.
Our Sony α6000 and lens kit from the July 2020 NEOWISE outing post. Lens versions unconfirmed.
Known body, unconfirmed lenses
Body
Sony α6000 / ILCE-6000, label visible in our photo
Sensor
APS-C, approximately 24.3 effective megapixels
Lens system
Sony E-mount
Exposure options
1/4000 to 30 seconds, plus Bulb
These body specifications are from Sony's February 2014 launch document, checked September 30, 2026. The body label is clear; the Sigma and vintage lens versions are not. An E-mount body does not make every pictured lens compatible without the right adapter. We have not tied each sky photo to a particular lens or recorded a long-term camera verdict.
Before choosing a camera for camp, compare the whole kit: body, lens, support and battery charging. Keeping the camera you already know is also reasonable. We are not recommending a current replacement based on this old photograph.
Manufacturer reference; we earn no commission from this link.
Camp fire
The fire pit that came after a mistake
Product photo: Outland Living. This is the manufacturer's image of the current Cypress, not a photo of our own fire pit.
Quick take
We’ve had it for years, used it on every trip since, and it’s still the same one, unchanged. It’s “one of the best buys we’ve done in a long time.”
What we loved
Used on every camping trip, and even at home: “an awesome accessory since we’ve had it.”
Same unit for years: “we haven’t changed anything and it works great.”
Still using the original cover and lava rocks it came with.
What bugged us
It “was a little big,” so it ended up riding on the roof rack instead.
Who it’s for: May suit campers who want a controllable propane flame without gathering wood, especially where wood fires are restricted, and who have roof-rack space to spare, since ours rode up there rather than in the trunk.
Long-term: Owned for “many years” (no exact count recorded) and still in use today, on every trip and at home. No repairs or issues are recorded. Still using the original cover and lava rocks that came with it.
On that trial-run trip near Julian, it was so cold that night that we built a wood fire, even though we were in a no-fire area. We almost got in trouble for it, and it was not responsible. Afterward we bought an Outland Living Cypress propane fire pit, and we have used it on every camping trip since, plus around the house. We still have it today. It came with a cover and lava rocks, and we are still using the originals.
We started with a standard 20 lb propane tank, then switched to a smaller one about half that size. The tank rode in the trunk. The fire pit itself was a little big, so it ended up on the roof rack to save space. It’s one of the best buys we’ve done in a long time.
Outland says its fire pits are tested and certified using a 20 lb propane tank and does not recommend anything smaller than 15 lb, because a smaller tank can mean a lower flame, a shorter burn time, and the tank frosting under the fire pit’s high heat output (Outland Living support article, modified August 10, 2022, accessed September 25, 2026). We ran a smaller tank than that. That is not what the maker recommends, and we have not recorded how the smaller tank performed for us.
Current specifications: Outland Living Cypress
Model
863 (FMPPC2F); our own unit’s exact model is unconfirmed
Size / weight
21 × 21 × 9 in; 26 lb with lava rocks
Output / fuel
58,000 BTU/hr maximum; propane; manual ignition
Certified tank size
20 lb; Outland does not recommend anything smaller than 15 lb
These are Outland Living’s current published specifications for the Cypress, checked September 25, 2026, not a confirmed match for our older unit. Read our fire-safe camping notes → before you plan to use any fire pit, propane or wood, where fire restrictions may apply.
Flames in the fire bowl, from our December 2019 Outland-tagged post. The label is out of view and the exact model remains unconfirmed. Check local fire restrictions before using wood or propane.
Select a photo to view the full frame.
Flames through the fire-bowl rocks, from our December 2019 Outland-tagged post. Exact model unconfirmed.
Story source
Our recollection, recorded September 2026, and the Outland-tagged December 2019 fire-bowl photo. The closeup does not identify the exact model.
Affiliate disclosure: The Sitpack button in the chairs note is an affiliate link, labelled where it appears. If you buy through it, we may earn a commission at no extra cost to you. Every other product link goes to the manufacturer and earns us nothing.
Fire-safe camping and fire pits
Check the rules for your campsite before lighting a wood or propane fire.
Propane does not mean automatically allowed
Check with the land manager before lighting a wood or propane fire. Some locations allow propane fire pits when wood fires are restricted; others prohibit both. Restrictions change with the season, and a “Stage 2” label can mean different rules in different places.
Outland Living, our fire pit’s maker, describes the Cypress on its product page as “CSA Approved: Yes – safe to use during most fire bans” (Outland Living, accessed September 25, 2026). That is the maker’s own marketing wording, not a rule, and “most” fire bans is not “all” of them. Confirm the current order for your location instead of relying on it.
Near Julian, in San Diego County, two official sources show why checking matters. The Cleveland National Forest’s general fire restrictions (last updated February 20, 2026, accessed September 25, 2026) allow wood or charcoal fires only in developed fire rings, and separately allow gas and liquid stoves and lanterns in all areas, without stating a clearance distance or permit requirement on that page. Whether a propane fire pit counts as a “stove” under a particular order is up to the agency that issued it, so ask rather than assume. The BLM California Desert District’s fire restrictions page (accessed September 25, 2026) states that in Stage II zones, which include “all San Diego County BLM lands,” there are “no open fires of any kind,” while “portable stoves and lanterns with shut-off valves” are allowed in both Stage I and Stage II only with “a valid California Campfire Permit.” We have not been able to confirm the Campfire Permit’s own wording directly (the state page did not load for us), so confirm permit and device requirements with the managing agency before you go.
Basic propane and campfire safety
Check current fire restrictions for your destination before you leave, and again once you arrive (BLM California fire restrictions, accessed September 25, 2026).
For a wood campfire, keep at least 15 feet of clearance from tents, vegetation and low-hanging branches, and never leave any fire, wood or propane, burning unattended (Smokey Bear campfire safety, accessed September 25, 2026).
Put a wood fire out completely before you leave it or sleep: drown it with water until the hissing stops, stir the ashes, drown it again, and check that it is cool to the touch (Smokey Bear campfire safety, accessed September 25, 2026).
Never check for a propane leak with a match or lighter. Propane smells like rotten eggs, a skunk’s spray or a dead animal; if you smell it, turn the cylinder valve off by turning it clockwise (San Francisco Fire Department outdoor grill and fire pit safety, accessed September 25, 2026).
Keep spare propane cylinders away from the fire pit. The San Francisco Fire Department gives this rule for grills: never store or place a spare cylinder under or near a barbecue grill (accessed September 25, 2026); we apply the same caution to a fire pit.
Do not attempt to refill a single-use propane cylinder, and always follow the manufacturer’s label instructions for handling and storage (National Park Service, propane canister safety for campers, July 17, 2018, accessed September 25, 2026).
Tank size is measured in pounds, not gallons
Consumer propane cylinders, including the standard grill and fire-pit tank, are rated and sold by the weight of propane they hold, in pounds, not gallons, because propane is a liquid under pressure that expands with temperature. A 20 lb tank holds about 4.7 gallons of liquid propane when completely full. This comes from a consumer source, not a government standard: Flame King, accessed September 25, 2026.
Another option
Cooking without a flame
If wood fires are restricted where you camp, a solar oven is another flameless way to cook. GoSun's Go is a small tube oven that GoSun says cooks a meal in about 20 minutes in full sun, and its Sport-E adds a 12V element for cloudy days or evenings. We haven't cooked with either one. Check the current fire order for your campsite, since restrictions can cover stoves too.